


ASLSK Basic Infantry Tactics
![]()
Basic Infantry Tactics
![]() The original Squad Leader rule book contained a section at
the end with a discussion of basic tactics to apply in the game.
The ASL Starter Kit does not contain such a section, which can
leave the novice ASLer a bit lost as to how to play the game, even
after having learned the rules. Although the tactics you apply
will, in general, be specific to the situation you encounter in a
scenario, there are some general principles a new player can
follow before mastering the tactical nuances of ASL.
The original Squad Leader rule book contained a section at
the end with a discussion of basic tactics to apply in the game.
The ASL Starter Kit does not contain such a section, which can
leave the novice ASLer a bit lost as to how to play the game, even
after having learned the rules. Although the tactics you apply
will, in general, be specific to the situation you encounter in a
scenario, there are some general principles a new player can
follow before mastering the tactical nuances of ASL.
Disperse Squads, but Stack for Firepower and Leader DRM
I mentioned previously the challenge of coping with the conflicting aspects of concentrating fire and dispersing units. In general, it is better to disperse your squads than to keep them stacked. The same is true in real life. Infantry concentrated densely in a single location is more vulnerable to enemy fire than infantry spread out across a broad area. When you stack your MMCs, a successful attack on their position can break or eliminate all of the squads. When unstacked, at most one squad is vulnerable (in most situations). Dispersing your units makes it more difficult for the enemy to choose which targets to fire on (because he cannot fire on all of them) and minimizes the damage of any one attack.
It is true that MMCs dispersed into multi-hex fire groups will lose the DRM of the leader originally stacked with them. It also is true that units that break without a leader present may not have a chance to rally the next turn. Still, a leader stacked with MMCs may also break during the attack that breaks the MMCs. Furthermore, the attacking player may self-rally one MMC during the rally phase, even if it doesn't have self-rally capability.
A mistake new players sometimes make is to think they can move leaders around to rally all of their broken units. What usually happens is that their dispersed broken units remain broken for the entire duration of a scenario. The key is not necessarily to keep MMCs stacked with leaders, but to keep leaders close to MMCs (see leader positioning discussion). Leader DRMs can be sufficiently advantageous to firing, that you should stack MMCs into single-hex fire groups with a leader if you need the DRM. In general, there is little benefit—other than immunity to cowering—to stack with leaders that have a zero or positive DRM. Finally, you should stack MMCs with leaders who have a higher morale than the MMCs. Otherwise, the leader is just as likely to break as the MMCs and won't be especially helpful during the rally phase.
The first turn a unit is broken, it will probably not rally succesfully because of the desperation morale penalty. Therefore, it's not that detrimental to spend a turn moving a leader to a broken unit; but if it should come to that, it's more efficient if several broken units are stacked together so they all can be rallied at once. As mentioned later, it's more efficient to rout units to leaders than to move leaders to broken units.
Disperse MMCs across multiple hexes when possible.
Stack MMCs when you need the firepower and leader DRM.
Avoid stacking with leaders with zero or positive DRMs; use those leaders for rallying.
Position Leaders Along Rout Routes
Don't stack your leaders with your MMCs unless you get a good firing DRM. Instead, position your leaders in locations where units can rout to them should they break. The tradeoff is that you lose the firing DRM and immunity to cowering. Furthermore, if your broken units can't rout to a leader, you may lose two player turns moving your leader to the units to rally them. A stacked leader may break during an attack, lowering the chances to rally accompanying units the next rally phase because a leader self-rally is required first. Deciding when to stack leaders and when to use them strictly for rallying routed units can be quite a challenge.
Don't Move in Stacks
Even though there are advantages to keeping MMCs stacked with leaders, you shouldn't move your MMCs in stacks (at least not in open ground) unless you absolutely need that leader movement bonus. By moving MMCs individually, you prevent an entire stack from falling victim to a successful full strength defensive first fire attack. Also, you can confuse your opponent by making feints with individual units, drawing defensive first fire for the units you move first, and allowing your later units to move without fear of defensive first fire. Therefore, try to move units individually (moving your leaders last), but end movement in a fire group stacked with a leader. By moving your leaders last, you have the opportunity to move them to units that break during the movement phase or move them to locations where broken units will rout during the rout phase.
Skulk
Skulking is a gamey tactic that—given the game's time scale—bears little foundation in reality. It is so commonly used, you'll be at a disadvantage if you don't use it yourself. It involves moving a unit one hex—out of the enemy line of sight—during the movement phase, only to move it back to its original position during the advance phase. Players that are primarily defending will use this tactic to avoid defensive fire. Players that are primarily attacking—attempting to take enemy held ground—cannot afford to skulk because it denies them the ability to prep fire.
Take Cover
It should be readily apparent from the terrain effects modifiers that you should take cover when possible, positioning units inside buildings and woods. Also, don't forget about smoke placement during the movement phase.
Disperse or Stack According to the Scenario
I've offered two points of view about dispersal versus stacking. The fact of the matter is that how you arrange your units will depend on the scenario. The number of squads and leaders available combined with the terrain and victory conditions dictate your options. For example, Scenario S2 forces you to spread out your squads in multi-hex fire groups (see Scenario S2 discussion). When you have limited cover, you may tend to stack your squads to share cover. When you have ample cover, you may tend to disperse your units to minimize the effects of attacks on a location.
Break Enemy Positions Before Advancing
Your squads will break. Get used to it. But so will your opponent's squads. The key to advancing on enemy positions is to concentrate your fire to break the enemy units before advancing. Broken units cannot fire upon you, allowing you to move next to them and force them to rout.
You usually need at least two fire groups to take a position held by a single enemy fire group. One fire group fires on the position during the prep fire phase, covering the later advance of the second fire group during the movement phase. In theory, the prep fire should break all of the enemy units, but in practice only some of them will break. During the movement phase, you can gauge whether you can survive any defensive fire from the position before advancing on it. Ideally, you will have a third fire group draw defensive first fire from the position (or contribute additional covering prep fire) before advancing on it with your second fire group. That way your advance will be subject only to a half-firepower subsequent fire attack (possibly doubled back to normal firepower at point blank range). After advancing next to the position, you can fire upon it during the advancing fire phase (half-firepower, doubled back to normal firepower at point blank range) to clean up any remaining Good Order units.
Although you can approach a position that isn't completely broken, it is safest to break the entire position with prep fire before moving adjacent to it. The more fire groups that prep fire to soften a position, the better. At the minimum, make sure you've induced any remaining Good Order units to perform defensive first fire before closing in on them. You don't need many units to perform the actual advance and you want to minimize your losses if defensive fire proves more successful than anticipated. After you've moved adjacent to the position during the movement phase, the broken enemy units will have to rout during the rout phase, allowing you to advance into the position during the advance phase.
The main concept to retain is that you shouldn't try to do everything with one fire group. You need to coordinate your fire groups, utilizing each during different phases of a turn to achieve your objectives. Think ahead and plan which fire groups will provide covering fire during the prep fire phase, which will move during the movement phase, which will fire during the advancing fire phase, and so on. Even though die rolls will often ruin your plans, you'll be better able to adjust if you have a coherent plan of attack.
Remember, the prep fire phase is your chance to minimize the effects of defensive fire so you can maneuver your units during the movement phase. The advancing fire phase is your chance to finish breaking a position before moving into it during the advance phase. If you don't break the position during the advancing fire phase, you want to make sure your close combat odds are good. Therefore, don't advance on an enemy position with a fire group that has a poor chance of surviving close combat. You want to avoid close combat when you can, but sometimes it's the only way to take a position.
Example of Taking an Enemy Position
The following example illustrates how to take an enemy position using the basic tactic of breaking the position before advancing. It is based on a real playing of Scenario S1.
| Initial Position | Prep Fire |
|---|---|
|
|
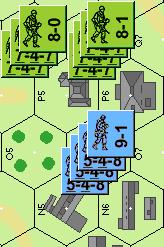
Initial Position
The initial position is the result of the American player trying to avoid German firing lanes. The American is trying to retake hexes N5 and N6. Hex N5 actually contains a German fire group which is omitted from the example to reduce clutter. American reinforcements enter from the north end of the map. Movement along the east and west roads surrounding the buildings expose them to enemy fire in the open. Therefore, the American player chooses to crack the German defenses from the north, where he can use the cover of buildings to make his approach.
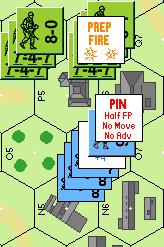
Prep Fire
During the Prep Fire Phase, the American player fires on the enemy position using his strongest fire group under the command of a leader with a -1 DRM, using a total of 21 fire points. The defender is in a stone building, resulting in a total DRM of +2 (i.e., -1 leader bonus +3 stone building penalty). The American rolls a 6, modified to 8, yielding a 2MC result in the 20 FP column of the IFT.
The German leader passes his morale check by the bare minimum, having rolled a 7 + 2, equaling his morale of 9. Therefore he becomes pinned and cannot contribute his DRM to the MMC morale checks. The rest of the units break, all failing their morale checks and thereby suffering desperation morale. Only one desperation morale counter is shown to reduce clutter.
| Movement and Advancing Fire |
|---|
|
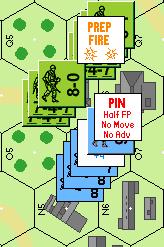
Movement and Advancing Fire
Now that the enemy has broken, it is safe for the backup fire group to approach the position during the movement phase. The squads move into the stone building in hex P5 using assault movement and survive defensive fire from the units in hex N5 (not depicted).
Having moved next to the enemy position, the squads fire on the enemy during the advancing fire phase. Their fire power is halved per the rules for advancing fire, but it is doubled for point blank range, yielding 14 points + 2 extra points of assault fire, for a total of 16 FP. Firing on the 16 FP column of the IFT with a +3 DRM, the American player rolls a 7 producing an adjusted value of 10 and a normal morale check result. All but one of the units pass their morale checks. The unit that fails suffers casualty reduction and is replaced by a broken 2-4-8 half-squad with a broken morale of 7.
| Rout | Advance and Close Combat |
|---|---|

|
|
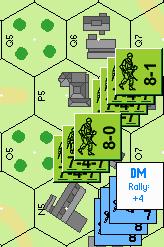
Rout
During the rout phase, the broken German units rout away from the adjacent American units. The German leader is pinned and therefore cannot choose to rout with the broken units (exception: voluntary breaking, an ASL rule omitted from the ASLSK).
Advance and Close Combat
With but one pinned leader left in the enemy position, the Americans advance on it, engage in close combat and eliminate the leader. The position is now taken, setting up an assault on hexes N5 and N6 during the next turn.
Keep Moving
For those situations where you need to take control of or cross enemy held territory, keep moving. Don't stall or time will run out before you satisfy your victory conditions. Staying mobile does not mean you should run haphazardly into a nest of machine guns. Nevertheless, you should not be paralyzed from fear of moving.
Movement does not always put you in danger because your opponent must decide whether or not to fire on a unit that crosses his line of sight. If your opponent is indecisive, he may try to save his defensive fire for the perfect opportunity which never arises, allowing your units to move unscathed. Continual movement toward your objectives denies your opponent the opportunity to make perfect defensive firing decisions. Still, you will require some prep fire and feinting[1] to facilitate movement. Also, don't move in stacks.
Pre-plot Lines of Sight
The defensive countertactic to mobility is to pre-plot lines of sight before the scenario starts. If you pre-establish your kill zones, you won't have to think twice about whether you have a clear shot. You still have to decide whether it is worth firing at a particular unit when it crosses your LOS.
Miscellaneous Tips
When defending, maximize your field of fire. Organize your fire groups to have converging fields of fire so they can cover each other.
If you're going to move only one hex, use assault movement to negate the FFNAM penalty.
Disrupt multi-hex fire groups by attacking their centers.
When attacking a well-defended line, isolate the weakest point of the line from reinforcement by establishing fire lanes. Use prep fire to weaken the positions before moving in.
[1] Half-squads are useful for feinting, but it's a gamey tactic to move half-squads to draw fire. Your opponent may not be fooled so easily. Be prepared to sacrifice a full squad for the greater good.