


ASL Starter Kit Scenario S2 Explained
![]()
ASL Starter Kit Scenario S2 Explained
Last Updated: 2005-03-04
Copyright © 2004, 2005 Daniel F. Savarese
Scenario S2 Analysis
![]() Learning the rules to a war game can be a difficult task,
even for the most experienced player. For a novice wargamer, the
more difficult task is to understand how a simulation model
translates into viable strategies and tactics. Knowing the rules
that govern the model is not sufficient to apply them effectively.
In particular, Advanced Squad Leader tactics can be difficult to
grasp because the combat model is so different from the
operational and strategic simulations to which many players are
accustomed. For example, zones of control (ZOC) and terrain play
an important part of structuring defenses in operational and
strategic simulations. In a 20th century tactical combat
simulation, where the ZOC modeling artifact does not apply,
covering approaches with multiple fields of fire is as critical to
a good defense as choosing when to fire on an advancing
attacker.
Learning the rules to a war game can be a difficult task,
even for the most experienced player. For a novice wargamer, the
more difficult task is to understand how a simulation model
translates into viable strategies and tactics. Knowing the rules
that govern the model is not sufficient to apply them effectively.
In particular, Advanced Squad Leader tactics can be difficult to
grasp because the combat model is so different from the
operational and strategic simulations to which many players are
accustomed. For example, zones of control (ZOC) and terrain play
an important part of structuring defenses in operational and
strategic simulations. In a 20th century tactical combat
simulation, where the ZOC modeling artifact does not apply,
covering approaches with multiple fields of fire is as critical to
a good defense as choosing when to fire on an advancing
attacker.
I will attempt to provide some guidance to the player who is new to tactical simulations by analyzing ASLSK Scenario S2. I provide merely an overview of some of the factors you should consider in devising your strategy for the scenario. I do not advocate a single approach to playing the scenario. The German strategy will depend on the initial Russian setup, but there are several Russian strategies and German counterstrategies that can be successful. Also, the cast of the die can ruin the best laid plans, be it through support weapon breakdowns or early arrival of enemy reinforcements. In fact, the uncertainty introduced by the dice requires you to devise contingency plans.
Scenario Summary
War of the Rats—or Rattenkrieg—depicts a snapshot of the block to block fighting that made the battle for Stalingrad infamous. Players of the original Squad Leader may see a similarity to the classic scenario, The Guards Counterattack. The Germans must take the offensive and capture three buildings before the end of the scenario, while the Russians must defend their ground and prevent the Germans from achieving their objectives. Figure 1 shows the mapboard for the scenario.
Victory Conditions and Scenario Length
The first thing you should do when preparing to play a scenario is read the victory conditions. It doesn't matter how many of your opponent's squads you break or destroy if you don't achieve the objectives specified by a scenario. ASL is a game. Therefore, in the interest of winning a scenario, you may engage in unrealistic behavior for the sake of satisfying a victory condition. For example, in the last turn of a scenario you may charge recklessly across a street to engage in close combat simply because you've run out of time and it's your last chance to take an objective before the game ends. Don't let that bother you. In a game, the victory conditions take precedence and the length of the scenario constrains your ability to achieve them.
Scenario S2 requires the German player to take control of the three buildings circled in red (see Figure 1) in order to win. If the German player fails to take control of all three buildings, the Russian player wins. In planning his defenses, the Russian player should keep in mind that he can give up ground—up to two buildings—and still win the game. The German player cannot spend too much time softening up Russian positions from a distance. There are only six turns in which he can attain victory.
Force Composition
This scenario introduces the ASLSK player to support weapons for the first time, featuring machine guns, a flamethrower, and two demolition charges. Machine guns are effective at long ranges, but flamethrowers require you to be within one or two hexes of a target and demolition charges have to be placed from a location adjacent to the target. In addition, flamethrowers do not suffer from terrain effects. Therefore, the German flamethrower and demolition charge will be used as assault weapons. The Russian forces will want to neutralize the squads carrying them before the weapons can be used.
The Russian forces contain as many conscript 4-2-6 squads as 1st line 4-4-7 squads. The conscript squads will only be effective at close range and are subject to more extreme cowering effects. Therefore, the 1st line units should man the machine guns at a distance and the conscripts should fight closer in. The conscripts—with a morale of 6—will break early and you'll need to position leaders appropriately to rally them.
Russian reinforcements enter on a randomly determined turn. These reinforcements are capable of assault fire and are commanded by a 9-2 leader. These are the units that will take back lost territory from the Germans. If they enter early, they can buttress the areas held by the conscript squads because of their short range. The leader's -2 bonus will be crucial to making successful attacks. Plan on what to do if the reinforcements never arrive because there is a chance they won't ever arrive.
The German has four elite units capable of assault fire and seven first line units with a range of six, two more than the elite units' range. Therefore, the elite units should carry the flamethrower and demolition charges while the first line units man the light machine guns. The elite units will move in and break enemy positions with assault fire and support weapons after the first line units have softened them with prep fire.
Special Rules
German elite units have their smoke exponent increased, making them more effective at placing smoke to cover an advance. Don't forget about this capability.
The Map
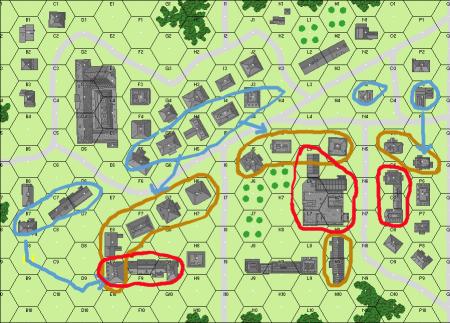 |
Objective buildings are circled in red. Areas the Russian player should focus on when setting up his defenses are circled in brown. Areas the German player should study when preparing his assault are circled in blue.
The Defense
The Russian player sets up first and faces quite a challenge. As the Russian, you have barely enough units to defend a broad swath of territory. Defense in depth requires sacrificing a building from the start. An alternative to defense in depth is to set up a collapsing defense, where you give up ground and retreat to a strong point. That approach should be designed as a delaying action until reinforcements arrive.
Open space is your friend and can be used for defense. Force the enemy to move in open ground. If you keep buildings and other cover between your forces and the enemy, you provide an easy means for your opponent to advance on you unchallenged. This scenario is one where spreading out your forces will be rewarded. By doing so, you make it difficult for several of your squads to be cut down at once. Also, you restrict your opponent's ability to maneuver.
There are several critical blind spots on the map. Preplot your lines of sight (LOS) before setting up. You won't be able to do so during the game[1], so make sure you know which locations your squads can fire on.
The three circled clusters of buildings forming a northern perimeter (H6, J5, and C5) are a useful defensive barrier. By setting up squads in these clusters, the German cannot advance on you without entering open ground and becoming vulnerable to defensive fire with FFMO and FFNAM modifiers. Make sure you form continuous fire groups so that your defensive fire will be effective. You won't be able to stop the German from making progress, but you can slow him down. Consider placing a reserve squad with a machine gun somewhere it can halt a breakthrough. The circled area containing hex M9 is a possibility for curtailing a breakthrough on your right flank, giving you a clear field of fire on the road that must be crossed to move from objective building O6 to objective building L6. Should the left flank break, the squad can reposition to protect it.
Short range units will get picked off from a distance unless they're positioned close enough to fire back. There's no use keeping them out of the action. Put those conscripts somewhere they can use their full firepower. The Russians have the disadvantage of setting up first, enabling the Germans to compensate.
The Attack
The German elite units have a high morale, assault fire capability, and an increased smoke exponent. They are the natural choice for assaulting Russian emplacements. If the Russian tries to defend the entire stretch, he will be most vulnerable at the flanks, where he can't mass a lot of firepower. That is where the elite units will be most effective. The Russian, however, has the potential to mass firepower on your center, especially with a machine gun supported fire group along hex grain E8-H6. Therefore, it may be necessary to deploy elite assault units in your center. Break up multi-hex fire groups by disrupting their centers.
You don't have enough elite units to assault from everywhere at once. Choose at most two points where you'll make your push. Possible assault vectors are indicated by arrows in Figure 1. Which way you choose to push will depend on the Russian initial deployment.
Your flamethrower can be used at two hex range at half firepower, so make sure to use it. Don't place it somewhere that starts out of range of enemy targets. Don't forget about the increased smoke exponent for your elite units. Place smoke before making a run at placing a demolition charge. Try to place a charge while threatening to do the same with another squad to confuse your opponent. If he is lured into firing on the first squad, the second squad will have a better chance. Always try to draw defensive fire before commencing to move in for the kill with assaulting units.
Don't be timid. You have an advantage as long as those Russian reinforcements do not arrive. Use that advantage to its fullest.
[1] If you declare a fire attempt and don't have LOS, you lose the firing opportunity but still have to mark your unit as having fired.